Dotnet Core Documentation
Introduction to Minimal API
We will create an event API to build on the concept of minimal APIs. This API will help you learn about:
Project structure
REST API
CRUD Functionality
We will use an in-memory database for now, meaning the data will not be permanently saved to the database. When the a### How it Works in .NET Core
ASP.NET Core has a built-in DI Container. Just the same way we registered the DbContext, the DI tells the system "When someone asks for an
AppDbContext, here's how to create it."Later, when your app needs that
AppDbContextin a class (e.g., a controller or service), you don't create it manually — the system automatically injects it for you.An example is registering AppDbContext with the In-Memory Database. It will register AppDbContext as a service. It then tells the system to use an in-memory database when creating AppDbContext.
Later, when we create a class, here's how the DI is injected:tion starts, it will clear any previous data. We will later connect to Microsoft SQL Server.
Requirements
Code Editor - Visual Studio is preferred
Fundamental concepts of C# language
Readiness to learn 🙂
Step 1: Create an Empty .NET Core Project
Step 2: What is Included in the Project and Running the Scaffolded Project
You should have the following code in the Program.cs file. Program.cs is the entry point of the application, and we will be referencing it several times.
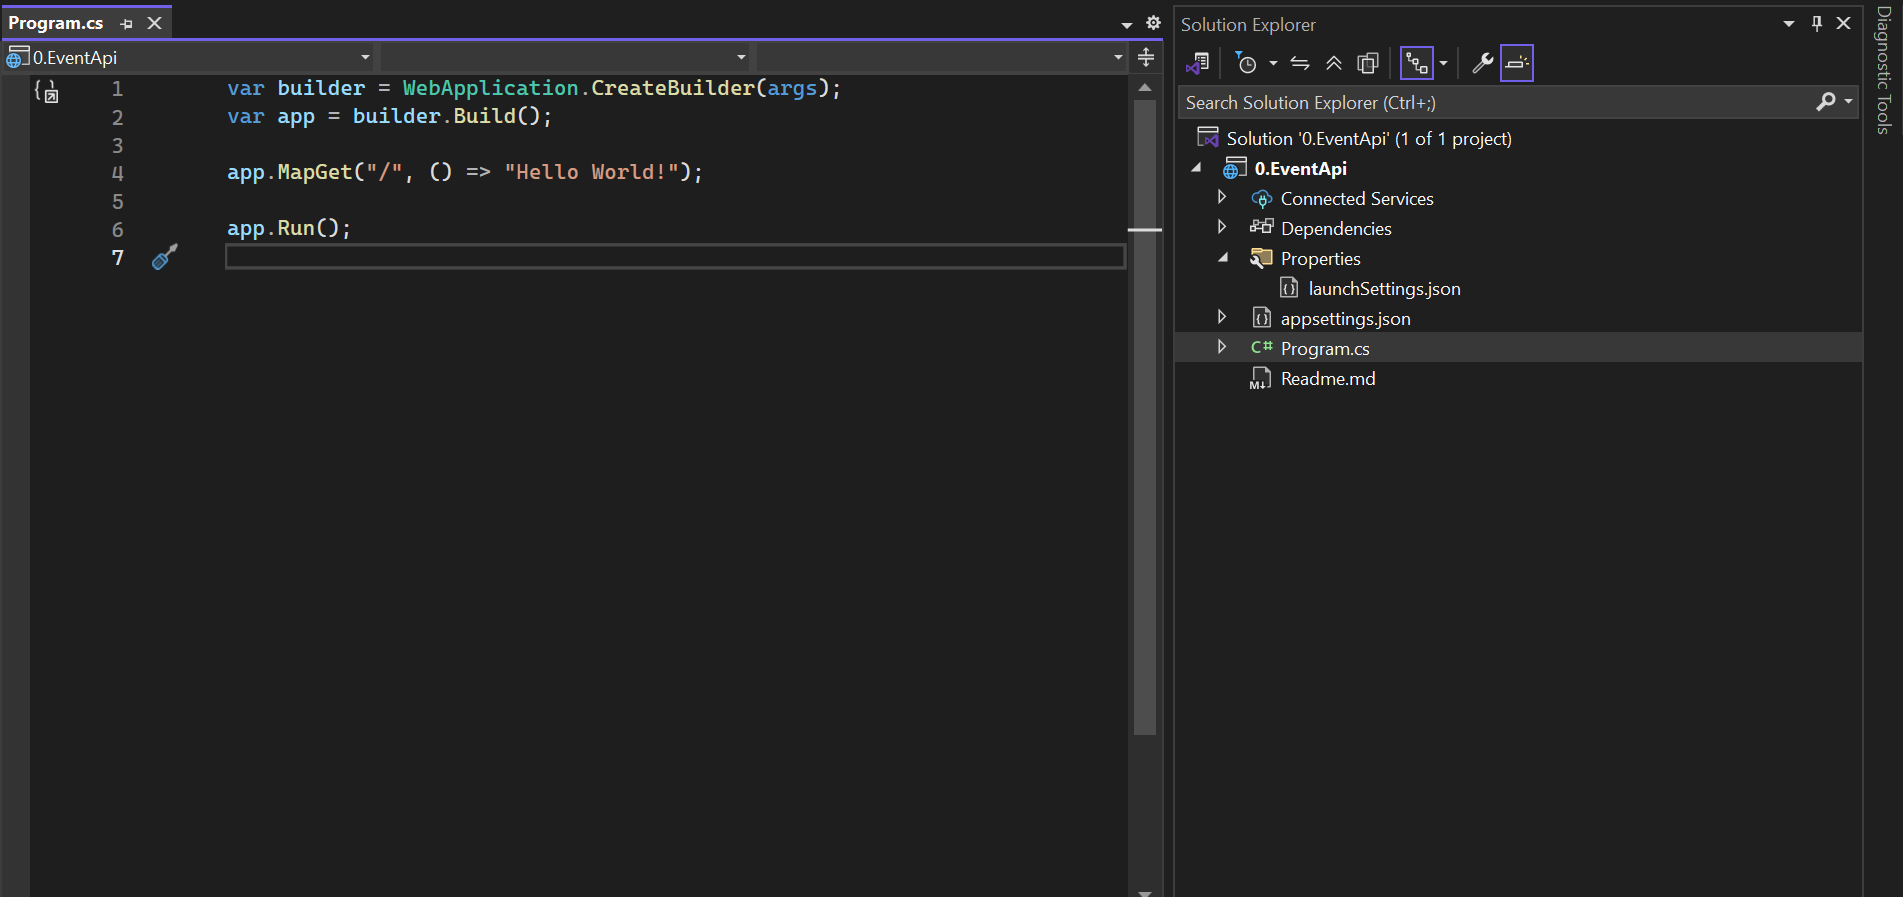
Press the keys Ctrl + F5 or click the "Run without debugging" button to run the application.
You should have a browser launched with Hello World being displayed. This shows that the project configuration looks good.
Let's break down the scaffolded project:
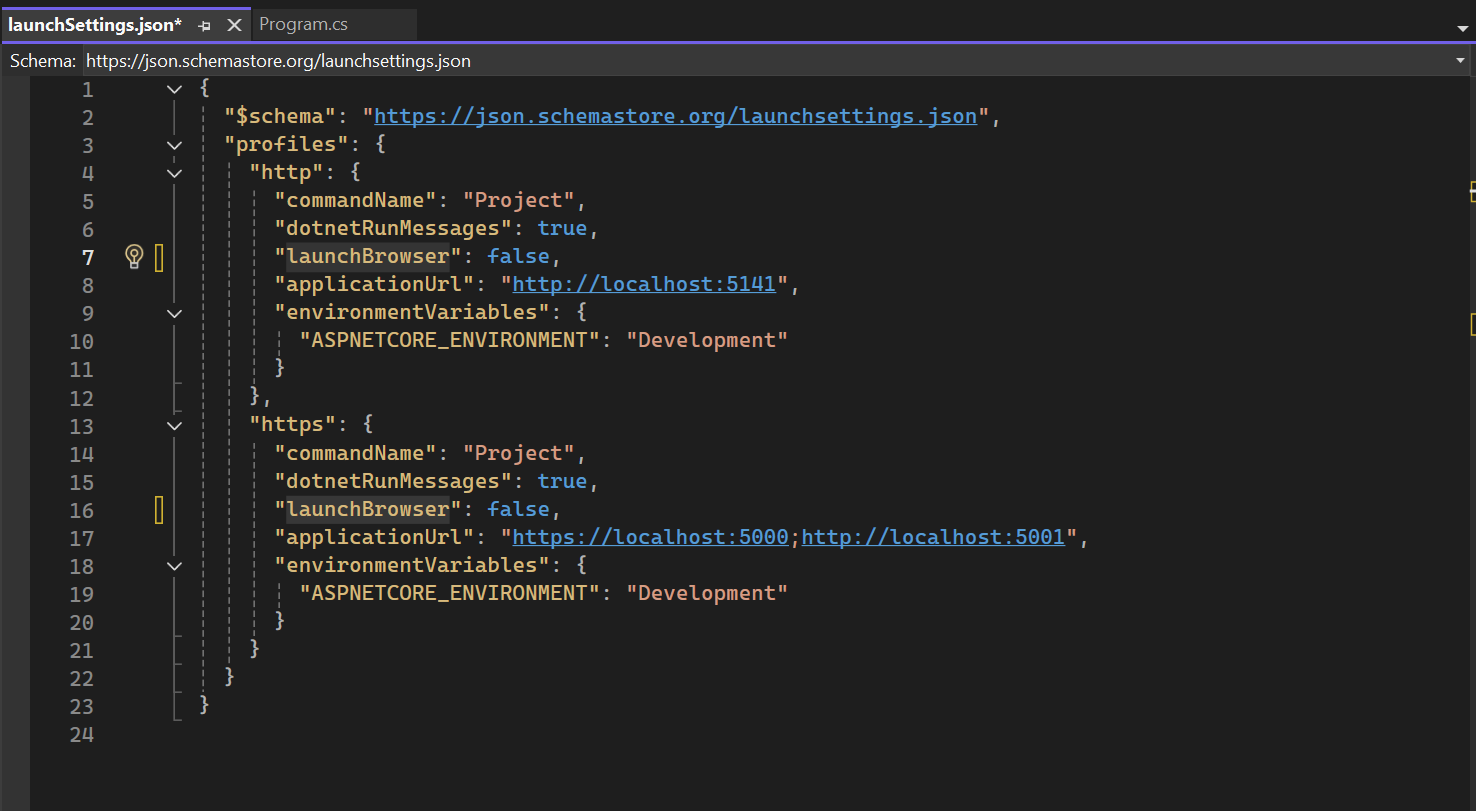
Properties/launchSettings.json
This file tells Visual Studio or dotnet run how to launch the app during development, including:
[ ] Ports
[ ] Whether a browser should open
[ ] Environment variables
[ ] HTTPS or HTTP settings
Schema
The above line defines the JSON Schema - this helps editors like VS Code with IntelliSense and validation.
Profiles
Defines a way to run the application - we have two profiles: "http" and "https"
[ ] commandName: tells dotnet to launch the main project with dotnet run
[ ] dotnetRunMessages: shows the usual logs like ("now listening on http://")
[ ] launchBrowser: used to auto-launch the browser
[ ] applicationUrl: Port where the application will be running
[ ] environmentVariables: Sets the environment variables like "Development"
To avoid having the browser launch every time you run your project, head to the Properties folder and open the launchSettings.json file. You should see a property called ***launchBrowser: "true"***. Change that to launchBrowser: "false" for both the profiles (http and https).
The Dependencies folder will hold all the packages we will be installing from NuGet Package Manager
What is NuGet?
NuGet is the package manager for .NET. The NuGet client tools provide the ability to produce and consume packages. The NuGet Gallery is the central package repository used by all package authors and consumers.
Connected Services Folder
This folder provides tooling to connect your application to external services like:
[ ] Web APIs - OpenAPI/Swagger for API calls
[ ] gRPC services - Add and consume gRPC endpoints
[ ] Azure Services - Connect to older SOAP/WCF services
[ ] Databases - connect to a database and generate models with EF
Program.cs File
This is the entry point of the application. Let's break it down:
var builder = WebApplication.CreateBuilder(args);
Used to create a WebApplicationBuilder instance
It configures services, logging, environment, and app settings
var app = builder.Build();
This builds the application
Creates a WebApplication instance, making the app ready to define endpoints and middlewares
app.MapGet("/", () => "Hello World!");
This is where you define your first API endpoint. Whenever you visit the endpoint, it returns "Hello World".
() => "Hello World!" - this is a lambda function that returns a string. Lambda is a concept in C#.
app.Run();
This starts the web server.
It starts listening for HTTP requests on the specified port(s)
It keeps the application running
Step 3: Create Models Folder
Add a folder at the root of the project and name it Models. The Models folder will hold all the entities we will be using. An entity is similar to a table in relational databases.
Inside the newly created Models folder, add a class named Event. This will hold the properties of an event.
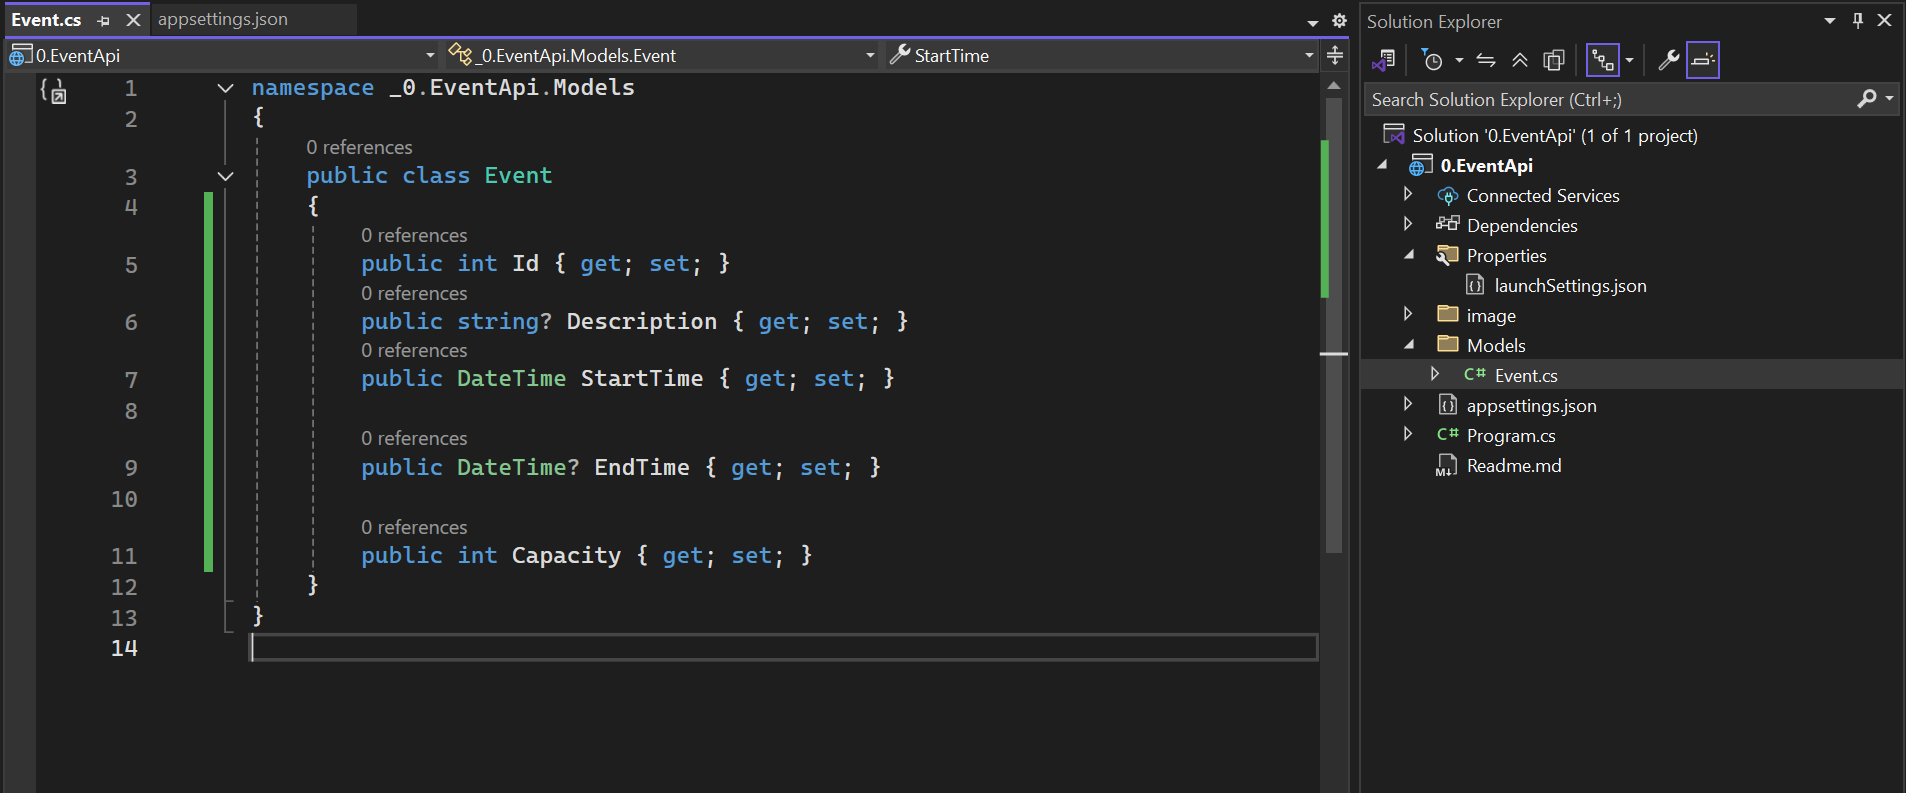
All the fields are made public, meaning they can be accessed from anywhere in the application
These properties are of different data types which simulate the real-world object of an event
The string property has "?" because by default, all strings are nullable
Concept of Nullable Reference Types
This is a concept that was introduced in C# 8.0. In older versions of C#, you could not be warned if there was a potential null value. With nullable reference types, C# became more strict and smart by helping you catch null issues at compile time.
public string Description { get; set; } - This means that you guarantee that the Description will never be null. If you do not initialize any value, the compiler will warn you.
public string? Description { get; set; } - This means that Description can be null. This tells the compiler that it's okay if the property is null, and it won't warn you.
Turning Nullable ON and OFF
This behavior is controlled by a setting in the .csproj file:
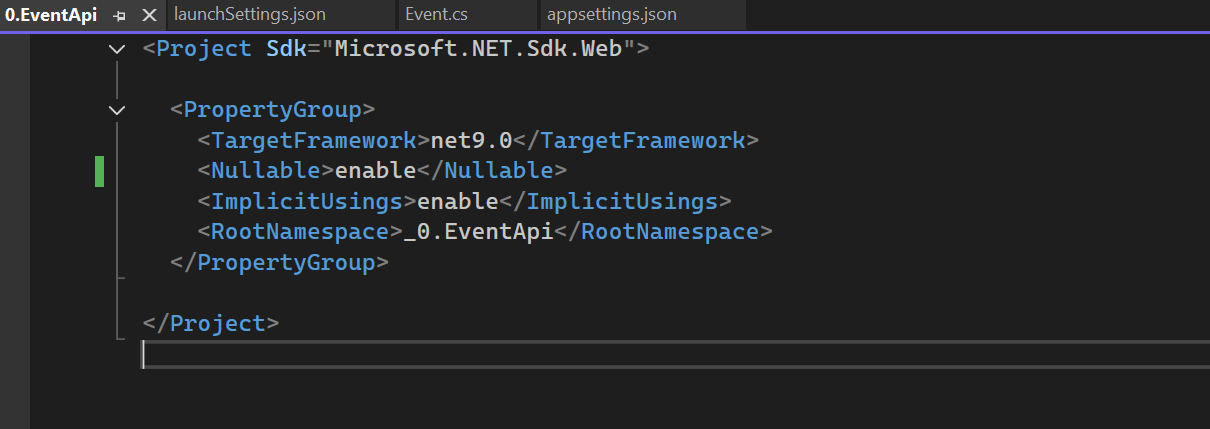
.csproj File
This is an important file - it's like the heart of the project configuration. It is an XML file that defines:
What files are part of the project
What dependencies (NuGet packages) are needed
What version of .NET to use
Build settings, project properties, and more
Step 4: EF Core and DB Context
Documentation/Resources
What is EF Core?
EF Core is a modern, open-source, and cross-platform Object-Relational Mapper (ORM) for .NET that eliminates the need to write complex SQL queries manually. It allows developers to work with databases using C# classes and LINQ instead of SQL.
EF Core acts as a bridge between .NET applications and databases, allowing developers to perform operations using object-oriented techniques.
Why EF Core?
1. Quick Story/Example
Imagine you're building a .NET application and need to interact with a database. How do you do it efficiently? You could write raw SQL queries, but that can be error-prone and hard to maintain. This is where an ORM (Object-Relational Mapper) like EF Core comes in handy.
2. How Do We Interact with Databases in .NET?
Before Entity Framework Core (EF Core), developers interacted with databases using ADO.NET, Dapper, or raw SQL queries. While these approaches provided control and performance, they often required writing a lot of boilerplate code for CRUD operations:
Open a database connection
Write SQL queries manually
Handle result mappings to objects
Manage transactions and exceptions explicitly
This process is repetitive and error-prone. This is where EF Core comes in.
3. Why Use EF Core?
a. Simplifies Data Access
EF Core abstracts database interactions, allowing developers to use C# objects instead of SQL queries.
b. Boosts Productivity
Eliminates the need to write repetitive SQL queries
Supports automatic migrations to handle database schema changes
Works seamlessly with LINQ queries for data retrieval
c. Supports Multiple Databases
EF Core is database-agnostic and supports multiple database providers, including:
SQL Server
PostgreSQL
MySQL
SQLite
Azure Cosmos DB
Setting Up EF Core
Step 1: Installing Database Provider
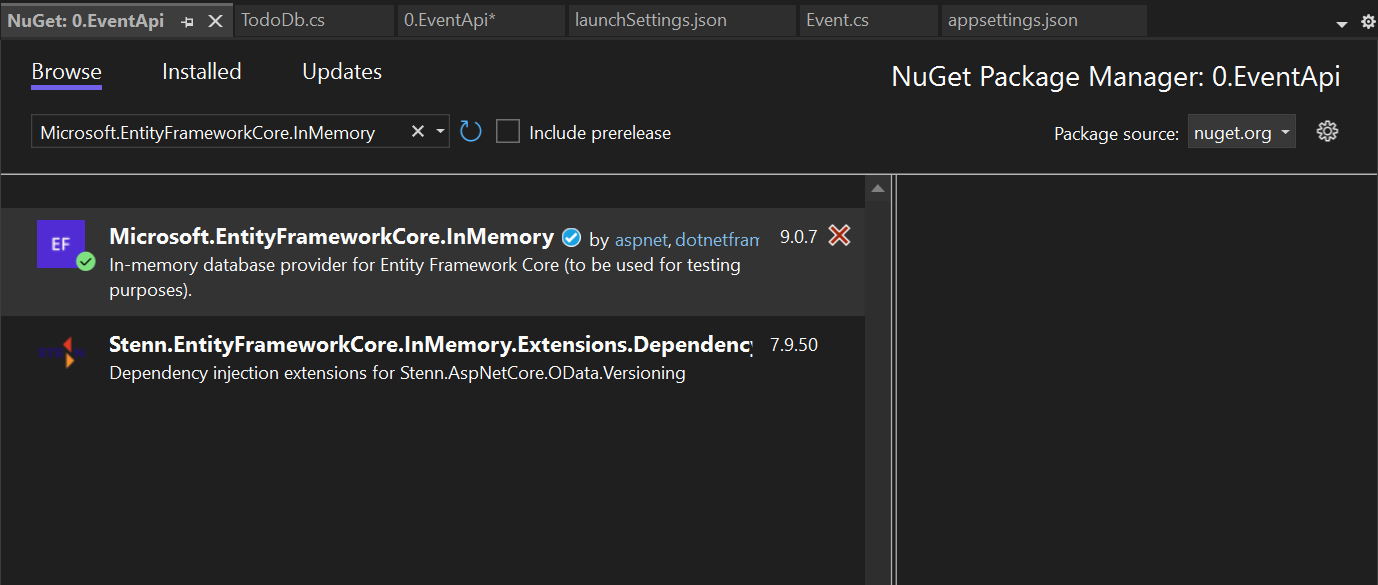
In Visual Studio, click on Tools → NuGet Package Manager and search for Microsoft.EntityFrameworkCore.InMemory and install it in your project.
This is an Entity Framework Core (EF Core) provider that allows you to use an in-memory database, mainly for testing or prototyping.
Limitations
No relational features (e.g., foreign keys, joins, transactions)
Doesn't always behave the same as real databases like SQL Server
Not suitable for production
We will later advance to use other database providers.
Step 2: Installing EF Core Diagnostics
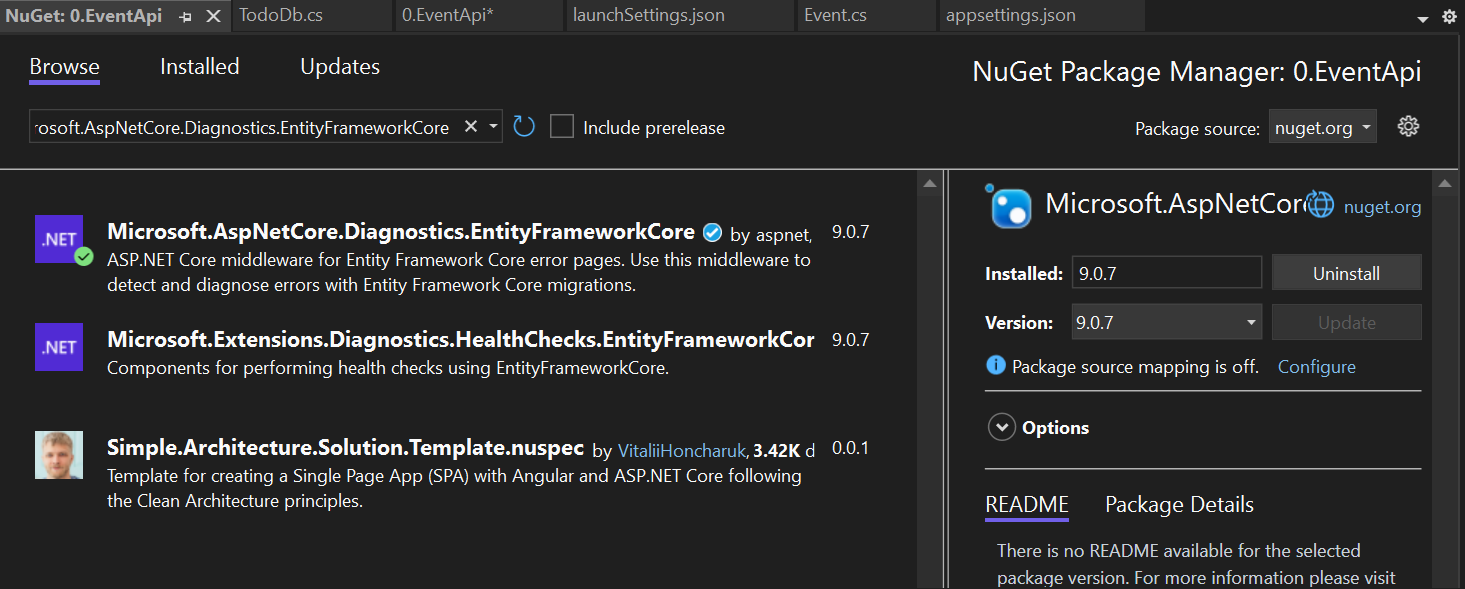
Search for Microsoft.AspNetCore.Diagnostics.EntityFrameworkCore and install it in your project.
It provides developer-friendly error pages for Entity Framework Core-related exceptions, especially during development, such as database errors, migration errors, and more.
This should only be used in development because it exposes detailed error information that could be a security risk in production.
When to Use
When you want better debugging support for EF Core issues during development
In educational or training environments, to help students understand why certain DB errors are happening
When you're building apps that heavily rely on EF Core and want improved developer feedback
We need to register our database provider in the Program.cs file, but first, let's learn about DbContext. 👇
What is DbContext?
DbContext is the main class in Entity Framework Core that manages database connections and is used to query and save data.
Think of this as a bridge between your C# code and your database.
What does it do?
Maps your C# classes (entities) to database tables
Allows you to query, insert, update, and delete data
Tracks changes to your data so it knows what to update in the database
Step 3: Create a DbContext Class
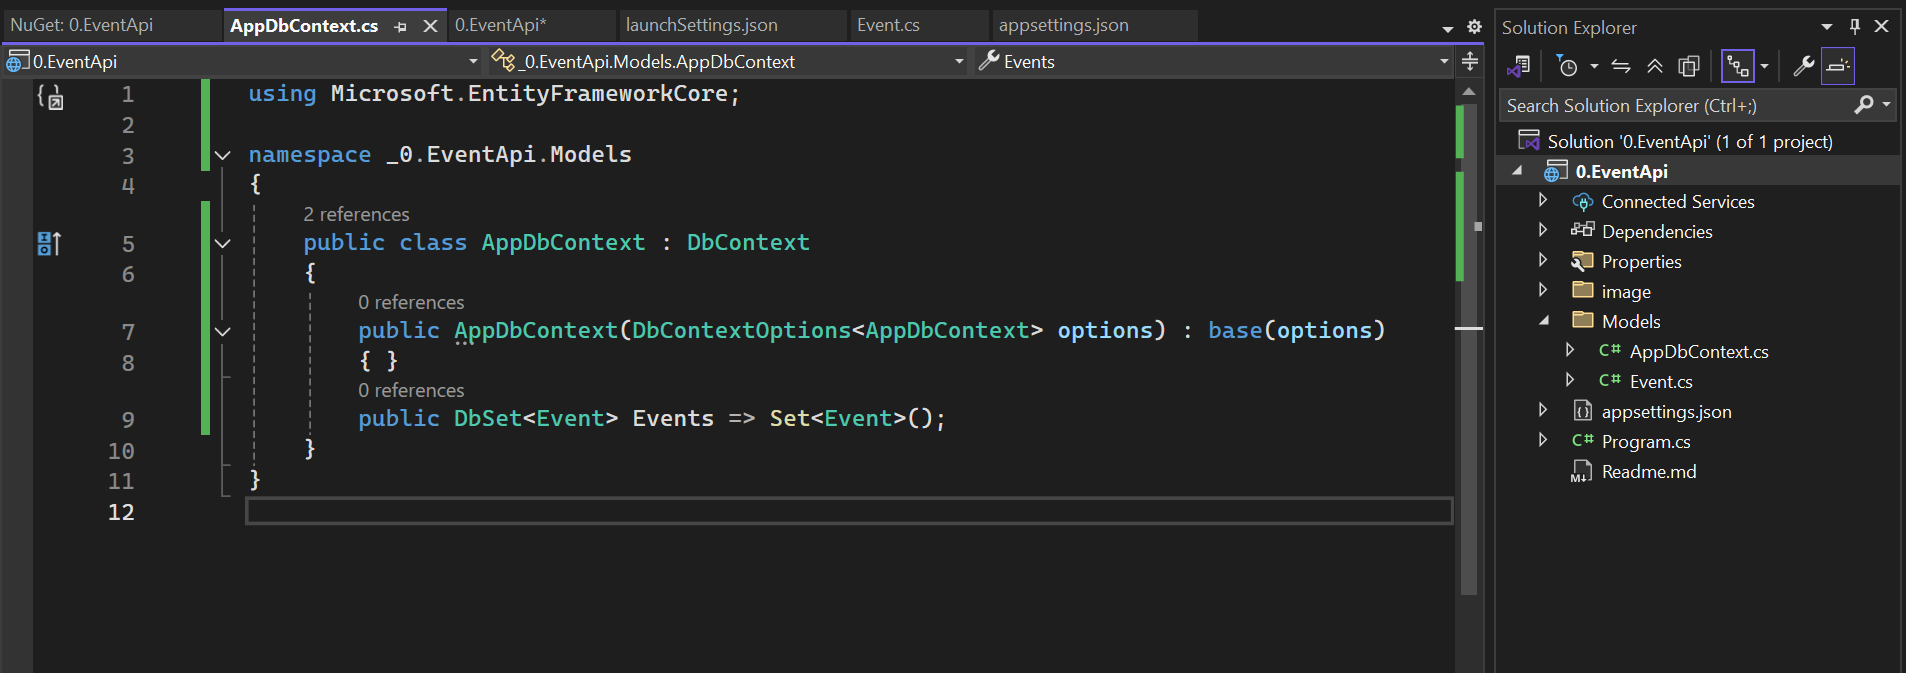
In the Models folder, add a new class and name it AppDbContext.cs
In the file, add the following:
Breakdown
The AppDbContext class is a central part of Entity Framework Core (EF Core). It represents a session with the database, allowing you to perform CRUD (Create, Read, Update, Delete) operations using C# classes.
Purpose
Connects the application to the database
Maps your models (e.g.,
Event) to database tablesEnables querying and saving of data
Term | Description |
|---|---|
DbContext | Base class provided by EF Core. It handles database operations and change tracking. |
AppDbContext | Our custom context class inheriting from |
AppDbContext(DbContextOptions | Constructor used to configure the context with settings like the connection string. |
DbSet | Represents the |
Set | Built-in EF Core method that initializes the |
Step 4: Register the Context in Program.cs
Add the following:

The first line registers the AppDbContext with the application's dependency injection (DI) container and configures it to use an in-memory database called "EventDb".
The second line adds a special developer-friendly error page that shows detailed database-related exceptions when running the app in development mode.
Helps you see detailed errors if something goes wrong with EF Core (e.g., migrations or invalid queries)
Makes debugging database issues easier during development
Only shows detailed errors when
ASPNETCORE_ENVIRONMENT=Development
This usage is possible because it is made available by the Microsoft.AspNetCore.Diagnostics.EntityFrameworkCore package.
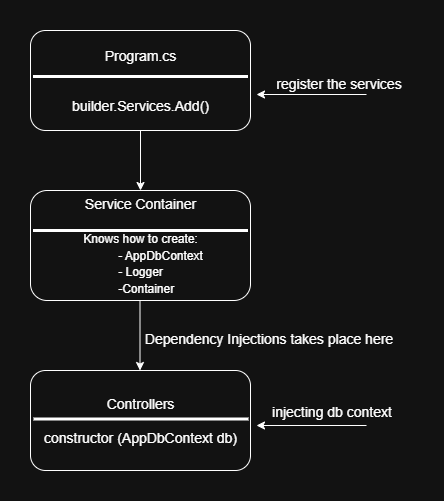
DbContext Flow

Concept of Dependency Injection (DI)
Dependency Injection (DI) is a software design pattern that helps us provide objects (dependencies) that a class needs, without creating them manually inside the class.
Think of it like this 🤔
If a class needs a tool (like a hammer), instead of building the hammer itself, someone gives it the hammer ready to use.
Why Use DI?
Keeps code clean and testable
Reduces duplication
Follows the principle of loose coupling (classes depend on abstractions, not on concrete implementations)
How it works in .NET Core
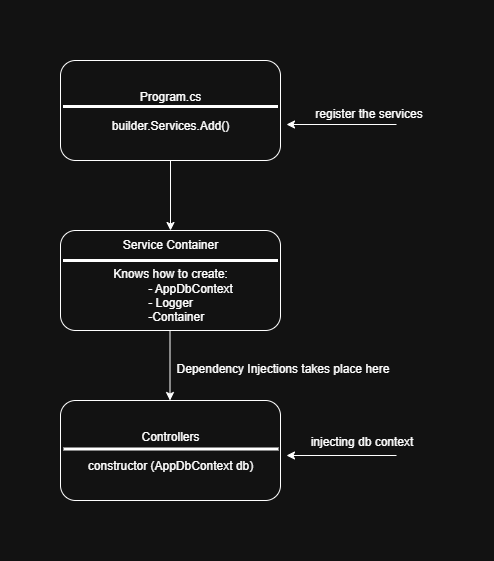
ASP .NET Core has built-in DI Container. Just the same way we registered the DbContext, the DI tells the system "When someone asks for an
AppDbContext, here’s how to create it."Later, when your app needs that
AppDbContextin a class (e.g., a controller or service), you don’t create it manually — the system automatically injects it for you.An example is registering AppDbContext with the InMemory Database. It will register AppDbContext as a service. It then tells the system to use in-memory database when creating AppDbContext.
Later when we shall be creating a class, here how the DI is injected.
You do not have to use "new AppDbContext(...)" because the framework injected it automatically.
Terms to Remember
Term | Meaning |
|---|---|
Dependency | An object a class depends on (e.g., |
Injection | Supplying the dependency from outside |
Service Container | Built-in system in .NET Core that holds all registered services |
Register | Telling the container how to create a dependency |
Resolve | The container gives you the dependency when needed |
Summary
How does AppDbContext work with Program.cs?
AppDbContext tells EF that you want to work with a table of Event objects (a database table)
Program.cs registers AppDbContext with the built-in Dependency Injection (DI). This tells the app that "Whenever someone needs AppDbContext, give them an instance that uses an in-memory database called EventDb "
In-memory database is used for testing and learning as it acts as a fake database stored in memory (RAM), so no actual SQL server is needed
When Program.cs registers AppDbContext, you can inject it in any part of your application. We will explore this when we write CRUD operations of our Minimal API
Step 5: CRUD Operations for REST API
We will now proceed to write CRUD operations for an Event API. The aim is to Create, Read, Update, and Delete. Once we have these foundations, it will be much easier to grasp more concepts.
Just after builder.Build(); you should have the following source code:
The last line of code should be app.Run();
Code Breakdown
Let's break down the source code for better understanding:
1. Create Event
This route handles HTTP POST requests sent to /event. Its purpose is to create and save a new event in the in-memory database.
Code | Explanation |
|---|---|
|
|
| Two parameters are injected: the event data from the request body i.e., Postman or REST Client (newEvent) and AppDbContext from the service container (db) |
| Adds the new event to the in-memory database's Events Collection |
| Saves changes to the database asynchronously (non-blocking) |
| Returns an HTTP 201 Created response with the newly created event and its URL |
Testing with REST Client now
The scaffolded project comes with REST Client which is used to test the endpoints of the application.
To generate the endpoints without needing to do them manually:
Hold
Ctrl + Qon your keyboard and search for "Endpoint Explorer"It will give you all the available endpoints
Right-click on the
POSTrequest and generate the request
On the generated endpoint, add the following data for testing:
2. Get All Events
What This Does:
This route handles HTTP GET requests sent to /events. It retrieves a list of all events stored in the in-memory database.
Code | Explanation |
|---|---|
| Route to the path |
| Injects AppDbContext via dependency injection to interact with the database |
| Asynchronously fetches all event records from the Events table and returns them as a list |
Testing with REST Client
Hold
Ctrl + Qon your keyboard and search for "Endpoint Explorer"It will give you all the available endpoints
Right-click on the
GETrequest and generate the request
On the generated endpoint, add a valid endpoint:
3. Get an Event by ID
What This Does:
This route handles HTTP GET requests sent to /event/ . It looks up a single event using the provided id from the database. If the event exists, it returns the event data; if not, it returns a "Not Found" response.
code | Explanation |
|---|---|
app.MapGet("/event/") | route a GET with dynamic id in the url path i.e /event/3 |
(int id, AppDbContext db) | The route handler takes the id from the URL and usesDependency Injection to get the AppDbContext. |
await db.Events.FindAsync(id) | Looks for the event with the matching id in the database. Returns null if not found. |
is Event @event ? Results.Ok(@event) : Results.NotFound()) | If the event exists, returns a 200 OK response with the event. If it doesn’t, returns 404 Not Found. |
Testing with REST Client (Get by ID)
Hold
Ctrl + Qon your keyboard and search for "Endpoint Explorer"It will give you all the available endpoints
Right-click on the
GET{id}request and generate the request
On the generated endpoint, add a valid id
4. Update an Event
What This Does:
This route handles HTTP PUT requests to update an existing event in the database. The client provides an updated version of the event, and if the event exists, its values are modified and saved.
Code | Explanation |
|---|---|
| Sets up a PUT route for updating an event by ID |
| The route handler receives the event id from the URL, the updated event data from the request body, and a database context via Dependency Injection |
| Tries to find the event in the database using the provided |
| If no event is found, it returns a 404 Not Found response |
| Updates each field of the found event with the new values provided |
| Commits the changes to the database |
| Returns a 204 No Content response to indicate the update was successful, but there's nothing to return in the body |
Testing with REST Client (Update)
Hold
Ctrl + Qon your keyboard and search for "Endpoint Explorer"It will give you all the available endpoints
Right-click on the
UPDATErequest and generate the request
On the generated endpoint, add the following data for testing:
5. Delete an Event
What This Does:
This endpoint handles HTTP DELETE requests to remove an event from the database by its ID. It first checks if the event exists and deletes it if found.
Code | Explanation |
|---|---|
| Sets up a |
| The handler receives the event id from the URL and uses the injected database context db |
| Checks if the event exists. If not, returns |
| Retrieves the event again and stores it in |
| Marks the event for deletion |
| Commits the deletion to the database |
| Returns a |
Testing with REST Client (Delete)
Hold
Ctrl + Qon your keyboard and search for "Endpoint Explorer"It will give you all the available endpoints
Right-click on the
DELETErequest and generate the request
On the generated endpoint, add a valid id:
Step 6: MapGroup
👉 Next, we will learn about TypedResults API to help us handle different responses of our system.